This is part three in a series of posts I’ve made reviewing recipes and products I tried out for my birthday. I’ll list the others at the end of this post if you want to check them out.
NOTE: You’ll need to think ahead with this recipe. I recommend chilling the ice cream mixture overnight or for at least 12 hours. Also, if you are using an ice cream maker with an insert you’ll need to make sure this is in the freezer a good 24 hours before you plan to make ice cream.
It’s important to have a thermometer for this recipe because you want to cook the egg yolks. This will make the ice cream base creamy and smooth. You don’t want to go over 185°F because the mixture will curdle. If you do mess up and go over 185° I would just continue with the recipe but after the pudding is completely chilled place it in a blender to make it smooth again. You’ll want to chill it again as whirring it in the blender may raise the temperature.
Place coconut milk [affiliate link], egg yolks and honey in a thick bottomed pan.
Whisk thoroughly.
Stir constantly over medium heat until the mixture reaches 180°F.
Remove from heat immediately. If you are using a thermometer which will notify you when it reaches a certain temperature I would set it for 179°F.
Allow to cool for about 30 minutes.
Stir in the sea salt, ground vanilla bean and vanilla extract.
Chill overnight for best results.
Place ice cream base in ice cream maker and turn until thickened to your liking.
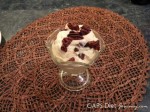
As you can see from my recipe, I did omit the coconut oil [affiliate link] and it is perfect. Creamy and delicious.
Pecan Pralines
I also decided I wanted Pecan Pralines in this ice cream and used this recipe: Honey Pecan Pralines from Cooking for Engineers. I did alter the recipe. It called for brown sugar which I omitted and used 3 tablespoons of honey. I also used 2 tablespoons of butter (instead of one).
Review on the pecan pralines: I’m not sure if my oven cooks hot, but the pecan pralines were slightly overcooked. Not burned, but very close. I would reduce all the cooking times by 1 minute. They were yummy and I munched on them all day.
Here are the other reviewed recipes – go check them out!
French Vanilla Coconut Milk Ice Cream with Pecan Pralines
Author: Starlene Stewart @ GAPS Diet Journey
Ingredients
3 cups of coconut milk
6 egg yolks
3 tablespoons honey
½ teaspoons sea salt
1 teaspoon ground vanilla bean, optional
1 tablespoon vanilla extract
Kitchen Equipment
Heavy-bottomed pan
Thermometer
Ice Cream Maker
Instructions
It’s important to have a thermometer for this recipe because you want to cook the egg yolks. This will make the ice cream base creamy and smooth. You don’t want to go over 185°F because the mixture will curdle. If you do mess up and go over 185° I would just continue with the recipe but after the pudding is completely chilled place it in a blender to make it smooth again. You’ll want to chill it again as whirring it in the blender may raise the temperature.
Place coconut milk, egg yolks and honey in a thick bottomed pan.
Whisk thoroughly.
Stir constantly over medium heat until the mixture reaches 180°F.
Remove from heat immediately. If you are using a thermometer which will notify you when it reaches a certain temperature I would set it for 179°F.
Allow to cool for about 30 minutes.
Stir in the sea salt, ground vanilla bean and vanilla extract.
Chill overnight for best results.
Place ice cream base in ice cream maker and turn until thickened to your liking.
GAPS DIET JOURNEY is a participant in the Amazon Services LLC Associates Program, an affiliate advertising program designed to provide a means for sites to earn advertising fees by advertising and linking to AMAZON.COM. GAPS DIET JOURNEY is an affiliate for several companies and may be compensated through advertising and marketing channels. Therefore, this post may contain affiliate links.
This is part two of a series of posts reviewing recipes and products I tried out on my birthday.
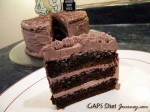
So my most favorite frosting in the world right now is from Modern Alternative Mama and her post is called: Refined Sugar Free Vanilla Buttercream. I made one full recipe to frost the cake above and was so completely thrilled when I sliced it to find that my frosting layers in the middle were nice and even. I was worried while spreading on the frosting that I wasn’t putting on enough, and I also didn’t bother to shave the cake to make it completely flat so I was worried that some areas were not be as even. I know, who cares? But I was concerned about it, and so happy when it came out so perfectly. I added two tablespoons of cocoa powder [affiliate link] *at the end once the frosting had emulsified to the recipe as shown to make it chocolate. (*Edited to indicate when to add the cocoa powder).
I had two new kitchen tools I got to use. One was my Polder Digital In-Oven Thermometer Timer, it worked great and it’s easy to figure out how to set it to alert me to the temperature of the honey [affiliate link] (which needed to come up to 240°F). The only problem was that the Brilliant Butter Warmer (which I impulsively splurged on for the sole purpose of making Buttercream Frosting!) was too small to hold the boiling honey. It was slowly, slowly boiling up and almost over when I snatched it from the fire. The instructions for the Buttercream Frosting say to get to soft ball stage, which is 240°F but I had to pull it off the heat at 235°F. I figured how much can 5 degrees matter so I decided to just use it at 235°F and it worked out just fine.
If you are fortunate enough to have a stand mixer, do not hesitate to use it. I decided to haul out our Kitchenaid mixer and making the frosting became 10 times easier. It’s like having another pair of hands!
The eggs [affiliate link] were whipped so nicely they were soft peaks, something I had not come close to achieving with the hand mixer.
Because my hands were free, I was able to pay attention to some other details, like I happened to feel the side of the bowl when drizzling the hot honey into the eggs and I was surprised at how hot the mixture had become! I used my new thermometer to check the temperature of the frosting to make sure it was at room temperature, and Modern Alternative Mama is right, it took just about five more minutes of mixing to cool down to room temperature, and then it was safe to begin adding in the room temperature butter.
If you are interested in watching most of the process of making this frosting using a hand mixer, watch my YouTube video here. I’ll let you in on a secret – I forgot to wait until the egg mixture was at room temperature so when we began dropping in the butter it was melting right away. My youngest son considers himself a chef… and he was assisting me. You’ll see him begin to dump in clumps of cold butter in an attempt to cool down the mixture. Eventually we succeed, and the frosting emulsifies. Whew! I would hate to waste all those ingredients. And having made it with the stand mixer, definitely use a stand mixer if you have one.
My son stopped by the store on his way home from work to pick up my candles, and so of course he thought the gravestone would be the perfect touch. The store clerk told him that 49 is NOT over the hill, and I would definitely agree.
Review on the frosting. I have always preferred the whipped cream frosting on cakes as opposed to the super sugary shortening version, and when someone would buy a cake from the bakery I could never figure out why they would buy sugary shortening version, the one that left a thick layer of shortening on the roof of your mouth? Why buy that, when you could get the whipped cream frosting which was light and airy and delicious?
This Buttercream frosting is even better. It is lightly sweetened and very creamy. The fact that it’s GAPS legal makes it that much better. And the recipe is super simple, with just four ingredients (five if you add cocoa powder). I have made this frosting four or five times now, and it is definitely a favorite around here. It goes extremely well with the cake, if you ask me. 🙂
GAPS DIET JOURNEY is a participant in the Amazon Services LLC Associates Program, an affiliate advertising program designed to provide a means for sites to earn advertising fees by advertising and linking to AMAZON.COM. GAPS DIET JOURNEY is an affiliate for several companies and may be compensated through advertising and marketing channels. Therefore, this post may contain affiliate links.
I tried several new recipes on my birthday and used some new products. I’m going to post each one in a series of posts.
First on the list, a recipe from Elana’s Pantry Chocolate Cake made with coconut flour [affiliate link]. I did not use the frosting she includes in that recipe because she calls for chocolate chips and while we can get these delicious semi-sweet chocolate chips from Enjoy Life which are gluten, dairy and soy free, they do contain evaporated cane syrup and are not GAPS legal.
This is the frosting I used and I added a couple of tablespoons of cocoa to make it chocolate: Refined Sugar Free Buttecream Frosting from Modern Alternative Mama. Dr. Natasha has approved cocoa powder [affiliate link] if you are no longer having digestive problems, and baking soda [affiliate link] is allowed when used for baking, according to the latest revision of the Gut and Psychology Syndrome book, so the rest of the ingredients are perfectly fine to have on full GAPS.
I followed Elana’s recipe except for the following:
Hers contains agave which is not GAPS legal so I substituted an equal amount of honey [affiliate link]
I did not have orange zest on hand, so I omitted it
Elana’s recipe called for two 9″ round pans, I used three 8″ pans
I subbed butter for the grapeseed oil (I’m sure you could also use ghee or coconut oil [affiliate link])
Review on the cake: Delicious. Moist. Nice chocolate flavor. Without a doubt, hands down THE BEST coconut flour cake I have EVER tasted thus far. The texture is very light in comparison to other coconut flour based baked goods. Definitely 5 stars.
In addition, I froze the remainder of the cake (which was almost all of it) so that I could see how it tastes after freezing. I had a piece straight from the freezer this morning, and it was delicious. I had a couple of reasons for freezing it. First of all, out of sight, out of mind. I do not need to be eating an entire cake. Although this cake is so dense and full of nutrients, and very rich tasting that one thin sliver is quite satisfying. My second reason is that I want to share my cake with my coworkers, and one coworker in particular who wants me to make a birthday cake for her upcoming birthday and I’d like for her to be able to taste test and see if she likes it enough for me to make this one for her.
I just love looking at the picture of this cake. 🙂
GAPS DIET JOURNEY is a participant in the Amazon Services LLC Associates Program, an affiliate advertising program designed to provide a means for sites to earn advertising fees by advertising and linking to AMAZON.COM. GAPS DIET JOURNEY is an affiliate for several companies and may be compensated through advertising and marketing channels. Therefore, this post may contain affiliate links.
Today I am going to share with you some about my son Matthew who is 25 years old.
In a previous post I had shared what happened when my husband and I learned our son had Down Syndrome:
It was real hard on me and my husband. The world went black for about three days. We were told it was truly as if our son had died. For the child we had grown to love would be “more normal than not” but he would not achieve the life we may have already imagined and anticipated. He would still run and play, talk and laugh, but he would be limited.
At any rate, I have always appreciated that his condition was concealed from us for three months. You see as a youngster growing up our pastor had instilled a fear into us of people with Down Syndrome. “Mongoloids” she called them. “Serpent seed (i.e. A child of Satan)”. My siblings and I used to call each other stupid retarded idiots. Mongoloid idiots. And I was always afraid of people with Down Syndrome. What a blessing that my child’s condition was not revealed at his birth or it could have affected my bonding with him. I loved him so much I never knew it was possible to love another human being so much.
Starlene, you should conclude how it has been to raise your son. I’m sure you love him so. I love people with Down Syndrome. That is why I went into Special Education because of two boys in high school that I just loved. People with Down Syndrome are as stubborn as I’ll get out, but so, so sweet. I’m sure it’s different being their mother. It is probably very frustrating, and life does take a different route because of it, I’m sure. But i would say just the opposite of a child of satan, I always felt like my friends (and students) with Down Syndrome were angels.
Erin, thanks for asking. I’d be glad to share.
Very sleepy Matthew, about 10 days old (1987)
When Matthew was three months old at a well baby checkup our pediatrician stated that he would like to have Matthew tested for Down Syndrome.
We were stunned since we had no clue. Matthew did not look like he had Down Syndrome. When I called my sister that night, who had given birth to a daughter with Down Syndrome two years earlier, she told me to refuse the test. She said, “He’s just trying to make money off you because he knows about my daughter.” She couldn’t believe it, because the photos I’d sent did not indicate he had anything wrong.
We did allow the doctor to run the tests, and he pointed out the characteristics which had alerted him to Matthew’s condition, which indeed he had noted at Matthew’s birth, but he wanted to be sure before he said anything.
He pointed out the simian crease in Matthew’s palms (which my father in law had – hmmm… now wondering if this is a MTHFR thing as well since father in law was born with Tetralogy of Fallot which is an MTHFR condition), the wider than normal space between his big toe and other toes, his low muscle tone. I had also noticed that Matthew did not smile when the books said he should, but that wasn’t such a big deal, children develop at different times. So we basically had no clue whatsoever when we found out.
We had three months of bliss, as I said, I’m glad for that. For one thing, Matthew is my son Matthew. His having Down Syndrome is way down the line. Matthew isn’t a “Down’s Kid” he’s a “Stewart Kid”. I sometimes forget to tell people he has Down Syndrome, and since he does not look so obviously like he has Down Syndrome people don’t even realize he has Down Syndrome. They realize he is developmentally delayed, and I soon remember to let them know, but it’s like an after thought for me, because he’s Matthew.
Just Matthew.
After we learned he had Down Syndrome, I visited with a woman whose daughter has Down Syndrome. She told me to always remember, “He will be more normal than not.” And I have found that to be true all these years.
We got Matthew started in early intervention when he was six months old and the Easter Seals program taught us how to work with Matthew at home. We went in once a week for therapy and continued working with him at home. The speech therapist was thrilled that I was nursing him and she said to continue for as long as I could since it was the best speech therapy Matt could have.
After Easter Seals we found a Montessori program for which Matthew was eligible. He attended for two years, and next we entered the public school system. The school psychologist and principal were on my side in mainstreaming him into a regular classroom. Unfortunately the teacher was not a good fit and she kept nagging at me to put Matthew into school for more hours each day (when he was showing regressive behaviors which told me he was at his limit). The principal kept going to bat for me and then one week he was out having surgery and the teacher pushed too hard by asking the social worker to come by my house to talk to me about the need for Matt to be in school for a full day — at the age of 5, when his mental age was about 4!! I decided to pull him and we homeschooled from that point on.
When Matthew was 14 we were required to take him to a psychologist to have his IQ tested. Because he didn’t know common things that people normally know, like the year, the month and the date, and some other common day to day knowlege, his resulting IQ was 40.
Matthew, 10 years old (1997)
It was disappointing but you know, if there was a test for figuring out IQ based on the things a person knows and enjoys, I’m sure his IQ would be much higher. He loves to draw and write the letters of the alphabet, and he can write his name from memory, as well as Mom, Dad and his brother’s name. He can count to ten, and he knows when it’s Friday because of Cartoon Friday. When he’s sad, he says he is a little boy and he tells us that he has to get his emotions under control. “My emotions,” he says. He has a wonderful silly sense of humor. He comes up with some pretty funny jokes at times, cracking us up, making us wonder what really goes on inside his head.
He knows how to cook quite well, in the above video he is sharing the spices he uses to season sausage. He is very animated when doing something he loves.
He knows how to make white sauce from scratch. Yes – putting butter in a pan, mix in flour, then whisk in milk and bring to a boil while stirring continuously. And his most famous recipe was Pizza Pasta. A concoction made with noodles, tomato sauce, cheese, pepperoni, ham, black olives and mushrooms.
Although his recipes have had to change since I have him on GAPS so he is learning to cook new recipes.
He can use the Spiralizer – remember he helped me put together a video to review the Spiralizer? He recently learned how to make zucchini spaghetti and when he proudly told his Dad he proclaimed, “I’m a man!”
He often says he is a grown man, especially when I ask him to get into the shower or ask him to take a detox bath. In this house of men, there are certain things men do and don’t do. He sets me straight when I don’t realize one of the rules. 🙂
Matthew on the Trampoline (1997)
We have family pictures on the wall. He sometimes stands in front of the pictures and mutters to himself about how he wishes I could be a nice mom like I used to be in the pictures when he was a little boy. You see, taking bread and crackers, flour tortillas, fast food, pasta and all his other favorites away has been hard on him, even though we did it very slowly. He can’t reason enough to understand that eating those foods causes him to have acid reflux, and causes him to overeat and gain weight. Sometimes he cries over the foods he misses, and that makes me feel like a mean, mean mother.
He does get angry sometimes, but for the most part he is mild mannered and easy going. He always apologizes and says, “My emotions, my emotions.”
Matthew at his 20th birthday party busting a gut laughing at the huge piece of cake he gave to his brother. (2007)
He can play Nintendo Wii so well it is astounding. His brother and he used to play together when they were younger, and younger brother would say, “Go to the basement” and he would go down the corridor, down the elevator, into the staircase, down the hall and into the basement. I was lost watching on the screen, but he had taken that route so many times he could do it in his sleep.
He knows how to use the remote control for not only the television, but the DVD player. He realizes that his Dad isn’t too good with technology and tells him, “You stupid, get Mom.” This makes us laugh at the irony.
We’ve slowly, slowly transitioned him over to full GAPS. My younger son still brings illegals into the house, so Matthew sometimes gets hold of some things, but for the most part he is off gluten and dairy (except butter). He has lost quite a bit of weight in the last two years, and I’m so very grateful that I found GAPS, because like myself, my son kept gaining weight every year. I was so scared for him, and it’s such a relief to see the scale going down.
Matthew, 17 years old (2004)
He is an excellent swimmer, and never had a lesson in his life. We went every day when the boys were young, every day that the public pool was open, we were there. I actually learned how to surface dive by watching him. We don’t go swimming hardly at all now, and it really bothers me to have learned how poisonous chlorinated pool water can be for our bodies. I wish we had lakes or the ocean nearby, because I love to see him swimming – he enjoys it so much.
That reminds me of one time we went swimming at a hotel in December 2004. Yes, we can go swimming in Arizona right in the middle of winter, since many places heat their pools. Of course as you know our body floats and he had a great time treading water, swimming, surface diving to the bottom of the 8 foot pool. When it came time to get out he swam over to the stairs and we’d been in the water about an hour. He started out of the pool and he groaned, “Ohhhh, pants wet. So heavy.” 🙂
Most of the time he is upbeat and happy, but he does get grumpy and aggravated and mad sometimes, just like all of us, he has his good days and bad days.
Recently one of my coworkers gave me an article written by George F. Will about his son Jon, who turned 40 this year. His son was born 15 years before Matthew. We were told the life expectancy for people with Down Syndrome was 50, and in this article Mr. Will states it is now 60.
Matthew will always live at home. I am glad I had him at 23, I expect to be alive for Matt’s entire life. I wish I could explain to him so that he could understand, that I’m not trying to be mean by taking so many of his favorite foods away from him. I wish he didn’t think I’m just being mean. By the way, he also thinks I shaved his head and that’s why he doesn’t have hair. In fact every time I cut his father or his brother’s hair, he starts cackling and laughing saying that they are going to be bald now. One of his personal jokes. 🙂 He started losing his hair at 2 1/2, and I’ve learned in the past couple of years that alopecia is an autoimmunity condition. I wish I had known all those years ago when the doctors told us there was nothing that could be done.
I can’t go back and change anything in the past, but we can press on to the future. I’m glad I found GAPS, and glad I learned about MTHFR. I used to feel so hopeless on how to help Matthew before GAPS, I worried so much about his health. I know GAPS isn’t any guarantee, but I feel it will improve Matthew’s quality of life to keep him eating real foods, just as it has improved my quality of life.
Thanks for reading.
GAPS DIET JOURNEY is a participant in the Amazon Services LLC Associates Program, an affiliate advertising program designed to provide a means for sites to earn advertising fees by advertising and linking to AMAZON.COM. GAPS DIET JOURNEY is an affiliate for several companies and may be compensated through advertising and marketing channels. Therefore, this post may contain affiliate links.
I had big dreams for these cookies. They taste great, but they didn’t turn out like I expected. They taste like mangoes, but if made them again I would not include the white chocolate chunks. The white chocolate was amazing, but it didn’t work so good for me baked.
I’m going to share them with you in case you want to experiment.
First I took three sweet, ripe mangoes, peeled them and removed the flesh from the seed. If you are going to use the mangoes as I did, it works great to just take them in your hand and squeeze over a bowl. The flesh will mash off and be careful as you get close to the seed because it has sharp edges. Use a potato masher to mash any large chunks.
Next I spread the mango flesh onto my dehydrator. I have these plastic discsthat set on the surface of the dehydrator shelves so that you can make fruit leather. Oh, and I also dried some pineapple. The one cut into small chunks was very sweet and ripe, while the larger pieces were tart and not as sweet.
At 12 hours into dehydrating I was able to pull up the mango flesh and flip it over so that it would dry on the other side. After 24 hours I removed it from the dehydrator and let it set for a few minutes to cool. It turned crispy and I was able to crunch it up into small pieces, then put it in my Magic Bullet blender and grind it into powder.
3 mangoes rendered 3-3/4 ounces of powdered mango.
Also, the previous day, I made the white chocolate chunk chips. I followed this recipe from Our Nourishing Roots: Honey-Sweetened White Chocolate. Except I only had 8 tablespoons of cocoa butter so I had to do some fractions to figure out how much honey [affiliate link] to use.
When I got to the part where you hit the mixture with a stick blender every 30 minutes until it turns opaque, after about 90 minutes I realized that my kitchen may never cool down enough to solidify so I ended up putting the bowl into ice water and blending with the stick blender. That worked out great, and I had this to show for it. It was delicious. It was amazingly delicious. I was so excited to see big hunks of white chocolate in my cookies.
Then I made these… dozens and dozens and dozens upon dozens of dozens of dozens of miniature white chocolate chips using my Cake Decorating Kit.
No wait. That’s what I’d envisioned… this is what I really made, one or two “perfect” and the rest were lumps and stars and bumps. If you look at the top of the photo you’ll see a blob and that’s where I finally gave up and made chocolate chunks.
This is also when I realized that my time management skills are nil.
Finally I commenced with the cookie making.
Mango & White Chocolate Chunk Medallion Coconut Flour Cookies
Mix the honey, eggs, coconut oil [affiliate link], vanilla and mango powder together using a hand mixer. Mix in the coconut flour [affiliate link] using the hand mixer. Allow to sit for a few minutes so that the coconut flour can absorb the liquids. Fold in the white chocolate chunks with a spoon.
Drop by even tablespoons onto a cookie sheet.
This dough is slightly firmer than previous Medallion cookie dough. I was able to pick up the tablespoons of dough and form them into a ball, then press down into a flattened circle.
Preheat oven to 325°F.
Bake for 8 minutes.
Makes 30 cookies with huge craters where the white chocolate chunks melted away into big puddles on the cookie sheet.
As I said earlier, the chocolate chunk-chips were amazing and delicious. I will try them again as I have just ordered a pound of cocoa butter from Mountain Rose Herbs; however, I do not think I will risk using the white chocolate in baked goods again. I think they would work great in Fudge Babies.
**If you order by clicking on any of my Tropical Traditions links and have never ordered from Tropical Traditions in the past, you will receive a free book on Virgin Coconut Oil, and I will receive a discount coupon for referring you.
Are these not gorgeous cookies?
ACK!! Craters!!! Agh! NO!! What happened?! What went wrong?
Homemade white chocolate chunk-chips (Recipe from: Nourishing Roots: Honey-Sweetened White Chocolate)
Instructions
Mix the honey, eggs, coconut oil, vanilla and mango powder together using a hand mixer.
Mix in the coconut flour using the hand mixer.
Allow to sit for a few minutes so that the coconut flour can absorb the liquids.
Fold in the white chocolate chunks with a spoon.
Drop by even tablespoons onto a cookie sheet.
This dough is slightly firmer than previous Medallion cookie dough. I was able to pick up the tablespoons of dough and form them into a ball, then press down into a flattened circle.
Preheat oven to 325°F.
Bake for 8 minutes.
Makes 30 cookies with huge craters where the white chocolate chunks melted away into big puddles on the cookie sheet.
Notes
Haha! 48 hours Prep Time.
Honey Sweetened White Chocolate Chunk Chips from Nourishing Roots:
http://www.ournourishingroots.com/honey-sweetened-white-chocolate-and-gaps-white-chocolate-chips/
GAPS DIET JOURNEY is a participant in the Amazon Services LLC Associates Program, an affiliate advertising program designed to provide a means for sites to earn advertising fees by advertising and linking to AMAZON.COM. GAPS DIET JOURNEY is an affiliate for several companies and may be compensated through advertising and marketing channels. Therefore, this post may contain affiliate links.
My husband brought home strawberries — they are on sale at our local grocery store. Usually when vegetables and fruits are on sale, they are in season and we rarely buy fruit unless it’s on sale because it is so expensive, and we don’t eat a lot of fruit.
You probably know that unfortunately strawberries are on the Dirty Dozen list of fruits and vegetables which are high in pesticides, so you may want to buy organic strawberries in making this recipe.
Strawberries are always on the list of dirty dozen foods, in part because fungus prompts farmers to spray, and pesticide residue remains on berries sold at market. Nearly 60 different pesticides have been found on strawberries, though fewer are found on frozen strawberries.
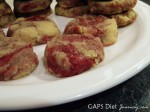
Strawberry Shortcake Medallions Coconut Flour Cookies Dairy Free
1 pound of strawberries, de-stemmed, cored and sliced thin
1/3 cup and 1 Tablespoon Coconut Oil [affiliate link]
vanilla bean caviar from 3″ vanilla bean, optional
Rinse and clean thoroughly 1 pound of strawberries. Remove the stems and the cores, and slice thinly. In a pan with a thick bottom, melt one tablespoon coconut oil. Add the strawberries. Bring to a boil and reduce heat so that strawberries are simmering. Stir regularly – about every five minutes. Simmer at low heat until strawberries have reduced to one half cup of jam. It took about 50 minutes for mine to reduce to 1/2 cup. Allow the strawberry jam to cool thoroughly before proceeding to the next step.
Sift coconut flour [affiliate link] and pack into 1/2 measurement, being sure to cut the excess off the top with a straight knife. Place into a bowl, along with remaining coconut oil, eggs, honey, vanilla and vanilla bean caviar. Whip with a hand mixer until mixed well. Allow cookie dough to sit for five minutes to allow coconut oil to absorb the liquids. The cookie dough is very soft. Please refer to the photo below to see what the texture should look like. If the dough is too soft it will be very smooth looking. With the right amount of coconut flour added it will have a thicker look to it.
Place cooled strawberry jam in with the cookie dough and lightly stir. You want to have a swirled effect in your cookies.
Preheat oven to 325°F. Lightly grease a cookie sheet.
Drop by level tablespoons onto the cookie sheet. Moisten fingertips with coconut oil and lightly pat and tap the cookie dough into a round shape.
Bake for 10 minutes. Cookies will lose their shiny look when done, and will feel firm to the touch. If pressing lightly leaves a dent, bake 1-2 more minutes.
Makes 27 cookies. Printable recipe available at the bottom of this post. This post was included at Fat Tuesday.
Strawberry Shortcake Medallions Coconut Flour Cookies Dairy Free
Author: Starlene Stewart
Prep time:
Cook time:
Total time:
Serves: 27
These cookies have a nice strawberry taste and if you close your eyes you can imagine them tasting like strawberry shortcake.
Ingredients
1 pound of strawberries, de-stemmed, cored and sliced thin
⅓ cup and Coconut Oil
½ cup and 2 Tablespoons Coconut Flour
⅓ cup honey
2 large eggs
½ teaspoon vanilla extract
vanilla bean caviar from 3″ vanilla bean, optional
Instructions
Rinse and clean thoroughly 1 pound of strawberries. Remove the stems and the cores, and slice thinly.
In a pan with a thick bottom, melt one tablespoon coconut oil.
Add the strawberries.
Bring to a boil and reduce heat so that strawberries are simmering.
Stir regularly – about every five minutes.
Simmer at low heat until strawberries have reduced to one half cup of jam. It took about 50 minutes for mine to reduce to ½ cup.
Allow the strawberry jam to cool thoroughly before proceeding to next step.
Sift coconut flour and pack into ½ measurement, being sure to cut the excess off the top with a straight knife.
Place into a bowl, along with remaining coconut oil, eggs, honey, vanilla and vanilla bean caviar.
Whip with a hand mixer until mixed well.
Allow cookie dough to sit for five minutes to allow coconut oil to absorb the liquids. The cookie dough is very soft. Please refer to the photo at recipe site to see what the texture should look like. If the dough is too soft it will be very smooth looking. With the right amount of coconut flour added it will have a thicker look to it.
Place cooled strawberry jam in with the cookie dough and lightly stir. You want to have a swirled effect in your cookies.
Preheat oven to 325°F.
Lightly grease a cookie sheet.
Drop by level tablespoons onto the cookie sheet.
Moisten fingertips with coconut oil – lightly pat and tap the cookie dough into a round shape.
Bake for 10 minutes.
Cookies will lose their shiny look when done, and will feel firm to the touch.
If pressing lightly leaves a dent, bake 1-2 more minutes.
GAPS DIET JOURNEY is a participant in the Amazon Services LLC Associates Program, an affiliate advertising program designed to provide a means for sites to earn advertising fees by advertising and linking to AMAZON.COM. GAPS DIET JOURNEY is an affiliate for several companies and may be compensated through advertising and marketing channels. Therefore, this post may contain affiliate links.


")