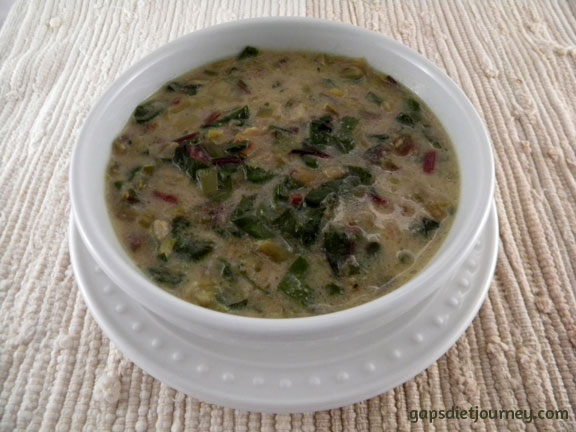
It’s June here where I live, and it’s hot out. Thankfully we have a wonderful air conditioning unit which keeps it nice and cool inside our home. My mom has been with us going on 10 months and today she told me she was thankful for her cool room. But I digress… even though it’s hot, I’m still making soup. On the stove top. I should really rethink that… our electricity bill is high enough without making the house warmer by cooking soup. The slow cooker is an awesome option at this time of year since I can let it cook out on the porch and it doesn’t heat up the house. Note to self: Use the slow cooker more often.
Today I made a soup that I really like. It reminds me of potato soup, just a little bit, even though there are no potatoes in it. Coconut milk [affiliate link] gives it a creamy look and taste with only a slight coconut flavor.
This soup is good hot, or cold. It’s especially refreshing cold, when it’s hot out! 🙂
Slice the root end off the leeks and discard. Remove the top 4″ of the green end of the leeks. Clean carefully, making sure to look through all layers for dirt. Slice thinly, about 1/8″ thin, add to the broth.
Chop garlic into thin slices and place in the pot with the leeks and broth. Cover and cook for 20-30 minutes.
Remove stems from beets. Set leaves aside. Slice stems into 1/4″ pieces. Add to the broth. Cover and cook 20-30 minutes.
Cut beet leaves into thin strips, add to the pot. Add parsley flakes, granulated garlic, salt and black pepper.
Cook 20 minutes.
Remove from heat, add one can of coconut milk. Stir together.
3 leeks, carefully cleaned and sliced thin (remove top 4″ of the tough green stems)
7 cloves garlic, sliced
beet tops/greens from two bunches of beets separated into leaves and stems
1 tablespoon parsley flakes
1 teaspoon granulated garlic
1 teaspoon salt
1 teaspoon black pepper
1 can coconut milk (my favorite is Natural Value’s organic)
optional: curry powder or Chicken Tikka Masala spice (only use if you like)
Instructions
Start 4 cups broth boiling in a large pot.
Slice the root end off the leeks and discard. Remove the top 4″ of the green end of the leeks. Clean carefully, making sure to look through all layers for dirt. Slice thinly, about ⅛” thin, add to the broth.
Chop garlic into thin slices and place in the pot with the leeks and broth. Cover and cook for 20-30 minutes.
Remove stems from beets. Set leaves aside. Slice stems into ¼” pieces. Add to the broth. Cover and cook 20-30 minutes.
Cut beet leaves into thin strips, add to the pot. Add parsley flakes, granulated garlic and salt.
Cook 20 minutes.
Remove from heat, add one can of coconut milk. Stir together.
Add spices to the pot of soup if you wish, or you could add them individually. I added ¼ teaspoon of Chicken Tikka Masala spice to mine. Curry powder would work as well.
GAPS DIET JOURNEY is a participant in the Amazon Services LLC Associates Program, an affiliate advertising program designed to provide a means for sites to earn advertising fees by advertising and linking to AMAZON.COM. GAPS DIET JOURNEY is an affiliate for several companies and may be compensated through advertising and marketing channels. Therefore, this post may contain affiliate links.
I love cocoa butter (my favorite cocoa butter is from Mountain Rose Herbs and this is my affiliate link) but I find myself avoiding using it because it’s just so difficult to get out of the container. I find myself attacking the container with a knife, scraping and twisting, trying to get enough out! It’s great if you are looking for shavings of plain cocoa butter but so far I’ve not had a use for that.
The other day I was using cocoa butter and this time I thought I would just put the container into a pan of water and let it simmer for awhile. I really intended to let it simmer just long enough to remove at a few tablespoons, and put the container back into the cupboard. Well, I ended up completely forgetting that I was melting the cocoa butter. Note to self: Next time turn on the stove timer! I’m just glad I found it before the pan boiled dry because I’m sure the plastic container the cocoa butter is in would have melted and then my cocoa butter would have been ruined.
When I saw that I had the whole container melted (about 8 ounces) I thought it was a great opportunity to rectify the problem I’d been having.
I came up with the idea that you see in the photo above. Just a few days ago I bought some of these ice cube trays with the intentions of making gelatin [affiliate link] cubes for my mom. They have a soft bottom to them so you can just push on them and the cube pops right out.
Each one held two teaspoons. After I had each one filled, I placed the trays into the freezer. About 15 minutes later, they were solid. They popped out so easily!!
I placed the cocoa butter cubes back into the container. Each “cube” holds two teaspoons. No more digging and scraping, or boiling and boiling the container just to get the cocoa butter out of the container. I think I’ll be using my cocoa butter more often now that I have it in a more convenient form!
GAPS DIET JOURNEY is a participant in the Amazon Services LLC Associates Program, an affiliate advertising program designed to provide a means for sites to earn advertising fees by advertising and linking to AMAZON.COM. GAPS DIET JOURNEY is an affiliate for several companies and may be compensated through advertising and marketing channels. Therefore, this post may contain affiliate links.
Matthew loves chocolate so I planned to make chocolate cake for his birthday. We all loved the chocolate cake I made for my 49th birthday and my 50th birthday last year. This recipe is adapted from Elana Amsterdam’s Chocolate Cake. I’ve swapped out several ingredients and used a lot less honey [affiliate link] plus I halved the recipe. For me, Matt and my husband, we really only need six cupcakes. These were yummy! Yes, we can have chocolate on GAPS, in case you’re wondering. Read more here: Chocolate on GAPS
The frosting is not super sweet either, but it is sweet enough to balance the cupcakes.
Coconut Flour Chocolate Cupcakes
6 Tablespoons coconut flour [affiliate link], sifted
2 tablespoons cocoa powder [affiliate link]
1/2 teaspoon sea salt [affiliate link]
1/2 teaspoon baking soda [affiliate link]
5 eggs [affiliate link]
1/2 cup butter
1/4 cup honey
1 teaspoon vanilla [affiliate link]
Usually I pack the coconut flour to measure but for this one I sifted first and lightly spooned the flour into the measuring spoon.
Place all ingredients into a bowl. Blend with a hand mixer until thoroughly combined.
Butter a cupcake tin. Dust the tins with a mixture of cocoa powder and coconut flour (I used one tablespoon of each).
Bake at 325°F for 20 minutes.
By the way, this recipe would easily make eight cupcakes. I divided the batter into the six cupcakes but they rose up high and spilled over. That worked out okay, but if you would rather get an extra couple cupcakes just butter and dust two more spots.
Then I needed some kind of frosting. I found this recipe from Wardee Harmon (GNOWFGLINS): Cream Cheese Frosting.
Chocolate Faux Sour Cream Frosting
In order to make this recipe you need to make a batch of my Faux Sour Cream or you could substitute with regular sour cream, or cream cheese. This frosting has a bit of a sour taste due to its probiotic nature. The slight sour taste is more apparent when you try the frosting by itself, but once it’s on the cupcake I didn’t notice it hardly at all and thought the combination tasted delicious together.
You’ll notice the recipe gives you the option to use 2 -4 tablespoons cocoa powder and honey. That’s because I thought the frosting tasted perfectly good with only 2 tablespoons of honey and 2 tablespoons of cocoa powder, but I didn’t think it would be sweet enough, or chocolate-y enough for my family so I ended up using 4 tablespoons of each. You can use your own judgement – taste the recipe at 2 tablespoons honey and cocoa powder and add up to four of each.
3/4 cup Faux Sour Cream
1/4 cup butter, soft
1/2 teaspoon vanilla
1/4 teaspoon salt
2-4 tablespoons cocoa powder
2-4 tablespoons honey
Place all ingredients into a bowl and blend on high speed until mixed thoroughly. The frosting will be fluffy.
This amount of frosting covered the six cupcakes with a small but in my opinion, perfect amount of frosting. If you are planning to make eight, and you like lots of frosting heaped up on your cupcakes you might want to double the frosting recipe.
GAPS DIET JOURNEY is a participant in the Amazon Services LLC Associates Program, an affiliate advertising program designed to provide a means for sites to earn advertising fees by advertising and linking to AMAZON.COM. GAPS DIET JOURNEY is an affiliate for several companies and may be compensated through advertising and marketing channels. Therefore, this post may contain affiliate links.
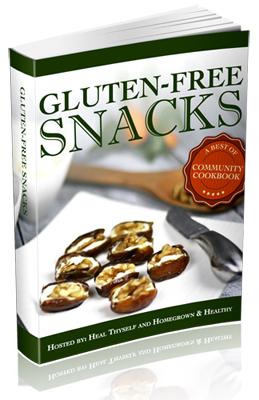
Gluten-Free Snacks is the 3rd community cookbook hosted by Pat Robinson from Heal Thyself and Aubrey Griffin Johnson from Homegrown and Healthy. The first was released in January entitled Winter Soups and the second was released in February entitled Naturally Sweetened Treats. Gluten-Free Snacks completes the set and is now available for just $3.97!
Gluten-Free Snacks is a 82-page electronic book which is instantly downloadable to any reader or computer. You can download it immediately after purchase and begin using it. You don’t need to limit your use of it to your computer, and you can load it to your iPad or email to your Amazon Kindle or other reader. You can also print it out, punch holes in it and place in a three ring binder.
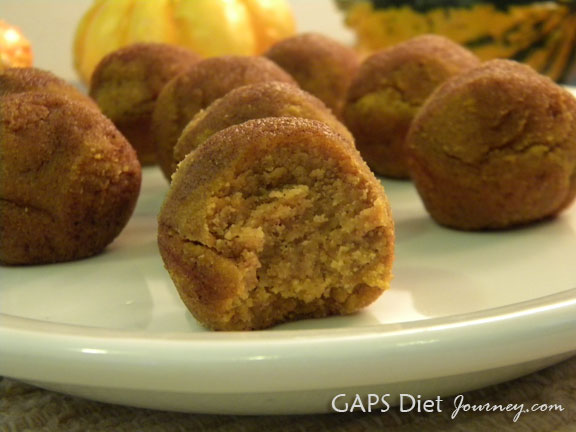
Pat and Aubrey asked us to share our favorite and most loved treats and desserts. I chose to include my Pumpkin Poppers which were a huge hit with my family. We can have doughnut holes again! Yay!
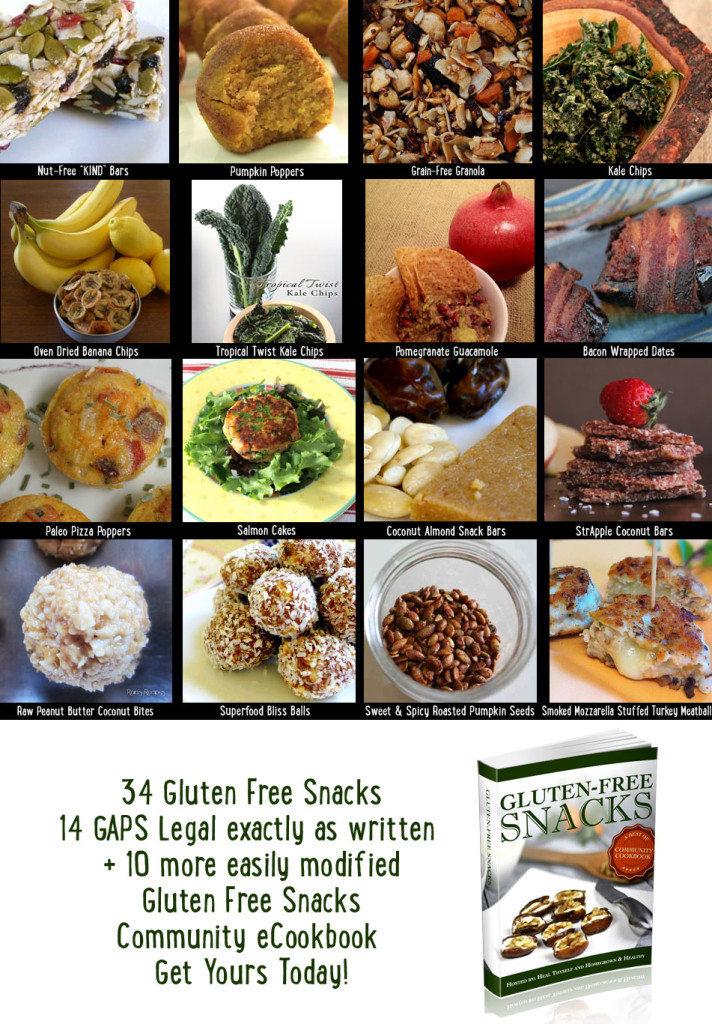
In addition to my favorite recipe, there are 33 more favorites + each recipe is accompanied by a photo of the soup – I have to tell you there are some GORGEOUS photos in this collection. In my opinion, photos are THE best part of a cookbook, don’t you agree?
As with Winter Soups and Naturally Sweetened Treats, I also took on the task of formatting and editing Gluten-Free Snacks. A lot of work has gone into putting this delicious e-book together and I know you’re going to love it!
In Gluten-Free Snacks you’ll get:
Savory Snacks
Baked Snacks
Crunchy Snacks
Dips
Hors d’oeuvres
No Bake Sweets
If you’re on the GAPS Diet, here is the rundown on what’s legal and what’s not:
14 Recipes are GAPS legal as written
10 recipes are GAPS Friendly
10 Recipes cannot be modified to be GAPS legal due to ingredients that cannot be substituted.
Of the 34 recipes, 24 are GAPS Friendly!
BONUS!
I’ve put together a companion guide for Gluten-Free Snacks to tell you which snacks are GAPS legal as written, and how to modify the 10 which are GAPS friendly. On the download page you will find a link to this bonus guide after you purchase your copy of Gluten-Free Treats.
Here is a list of the 14 snacks in this e-book which are GAPS Legal:
Below you can see the collage I put together of the GAPS legal snacks. Gorgeous?? Or rather, delicious?
30 DAY GUARANTEE: I’m so sure you’ll love Gluten-Free Snacks that I will refund your purchase price in full within 30 days of purchase. Check it out and let me know what you think.
For a limited time only, Gluten-Free Snacks is just $3.97.
Special thanks to Pat [Heal Thyself] and Aubrey [Homegrown and Healthy] for organizing this project, and collating the recipes. Thank you to Vivian [The Real Food Guide] for creating the beautiful cover and thank you to Tracy from [Oh, The Things We’ll Make!] for allowing us to use her gorgeous photo of her Cheese and Walnut Stuffed Dates as part of the cover. Thank you to Jackie Patti from Deductive Seasoning for helping to collate and edit.
GAPS DIET JOURNEY is a participant in the Amazon Services LLC Associates Program, an affiliate advertising program designed to provide a means for sites to earn advertising fees by advertising and linking to AMAZON.COM. GAPS DIET JOURNEY is an affiliate for several companies and may be compensated through advertising and marketing channels. Therefore, this post may contain affiliate links.
A few days ago I posted a recipe for cashew nut yogurt made in such a manner that it doubles wonderfully for dairy-free sour cream. I promised I would share some recipes with you that use this. Here’s one that was a big hit for my family. We have loved ranch dressing for years and <gag> even used to buy the box mix to make it with store bought mayonnaise and sour cream. Those little packets are pretty expensive so I learned how to make my own using spices. Then we’d only buy the expensive (MSG laden) packets for special occasions. <yikes!>
In the image above I used my mandolin to slice the cucumbers and radishes. I actually learned something new about my mandoline – I learned how to adjust the part that allows me to make the rippled slices!
If you find any other inventive ways to use this sour cream, please let me know in the comments!!
Save
If you love recipes like this, I have two cookbooks you really need to check out ASAP! Beyond Grain and Dairy for gluten-free recipes and Winter Soups
GAPS DIET JOURNEY is a participant in the Amazon Services LLC Associates Program, an affiliate advertising program designed to provide a means for sites to earn advertising fees by advertising and linking to AMAZON.COM. GAPS DIET JOURNEY is an affiliate for several companies and may be compensated through advertising and marketing channels. Therefore, this post may contain affiliate links.
How delicious does that look? I need to make another loaf right now!
One of my favorite things in life is a slice of bread, hot from the oven, slathered with butter. A close second is the smell of fresh baked bread.
You too? I don’t know many people who don’t love fresh baked bread. I know quite a few that can’t have “regular” bread any longer, like me. Yes, fulfilling that desire becomes a bit of a challenge when you don’t eat grains and starches, but thank goodness I’ve learned how to work with coconut flour [affiliate link] because I can enjoy homemade bread again. This delicious lightly sweetened loaf hits the spot with just the perfect amount of cinnamon [affiliate link].
This bread is wonderful slathered with butter, nut better and fruit preserves, or best yet a mixture of butter, honey [affiliate link] and cinnamon.
Matthew loves bread of any kind. As far as he is concerned, bread is bread is bread and he used four slices as hamburger buns. 🙂
Preheat oven to 325°F. Be sure oven is preheated to the correct temperature before placing the loaf in the oven.
Grease a loaf pan* and line with parchment paper for complete ease in removal of loaf when done.
If you are making your own applesauce, peel and core one apple, I used a Red Delicious. Dice into small pieces and place in a small saucepan with 1 tablespoon coconut oil and 1/4 cup water.
Bring to a boil and simmer for five minutes. Turn off heat and allow to sit covered for ten minutes. The apples should be very soft. Mash with a fork or potato masher. Measure out 1/2 cup for the recipe.
Measure out 2 tablespoons honey and place in a small bowl with 1 teaspoon cinnamon. Mix well. Set aside.
Place eggs, honey, sea salt, vanilla, 1/2 teaspoon cinnamon and applesauce into a mixing bowl. If you didn’t make your own applesauce, add in one tablespoon melted coconut oil. With an electric mixer, mix at low speed until all ingredients are fully incorporated.
To measure the coconut flour, pack firmly into the cup measurement and use the back of a straight knife to level the flour even with the top edge of the measuring cup.
To ensure there are no lumps, sift flour.
Begin by adding half of the coconut flour into the ingredients. Blend until well mixed and allow to sit for 2 minutes. Add remaining coconut flour to achieve a thick batter. It’s better to add flour in small amounts until you find the correct texture than to compensate by adding more liquids and fats.
The batter for this loaf will be soft and fluffy in texture.
Remove 1/2 cup of batter from the bowl and mix in with the honey and cinnamon mixture. Set aside.
To the remaining batter, add baking soda and mix quickly and completely.
Add apple cider vinegar and mix together quickly.
Place one cup of batter into the loaf pan and spread out evenly using a spoon or spatula spreader. Spoon half of the cinnamon/honey mixture over the batter.
Pour the remaining batter over the top of the cinnamon mixture and spread evenly to the sides. Pour the remainder of the cinnamon mixture on top and swirl with a knife.
Place immediately into a preheated oven. Bake 45 minutes. Loaf will look nicely brown on top, firm on the sides but may be still slightly squishy at the center. If so, lightly cover with a tent of aluminum foil and bake 10 more minutes.
At this point if the top still feels slightly squishy, turn off the oven and leave the loaf for 5 or 10 more minutes. This will usually allow the loaf to finish baking fully.
*The loaf pan I used was metal and measured 8.5″ x 4.5″ x 2.5. This is one available from Amazon that is the size I used: 8.5 Inch Loaf Pan
Slightly sweet with just a hint of cinnamon. Delicious with nut better and fruit preserves, slathered with butter or best yet a mixture of butter, honey and cinnamon.
Ingredients
7 large whole eggs
⅓ cup honey + 2 tablespoons honey – divided use
½ teaspoon sea salt
2 teaspoons vanilla
1 – ½ teaspoon cinnamon – divided use
½ cup coconut flour, packed
½ cup applesauce (or make your own using one apple)
1 tablespoon coconut oil
½ teaspoon baking soda
2 teaspoons apple cider vinegar
Instructions
Preheat oven to 325°F. Be sure oven is preheated to the correct temperature before placing the loaf in the oven.
Grease a loaf pan* and line with parchment paper for complete ease in removal of loaf when done.
If you are making your own applesauce, peel and core one apple, I used a Red Delicious. Dice into small pieces and place in a small saucepan with 1 tablespoon coconut oil and ¼ cup water.
Bring to a boil and simmer for five minutes. Turn off heat and allow to sit covered for ten minutes. The apples should be very soft. Mash with a fork or potato masher. Measure out ½ cup for the recipe.
Measure out 2 tablespoons honey and place in a small bowl with 1 teaspoon cinnamon. Mix well. Set aside.
Place eggs, honey, sea salt, vanilla, ½ teaspoon cinnamon and applesauce into a mixing bowl. If you didn’t make your own applesauce, add in one tablespoon melted coconut oil. With an electric mixer, mix at low speed until all ingredients are fully incorporated.
To measure the coconut flour, pack firmly into the cup measurement and use the back of a straight knife to level the flour even with the top edge of the measuring cup.
To ensure there are no lumps, sift flour.
Begin by adding half of the coconut flour into the ingredients. Blend until well mixed and allow to sit for 2 minutes. Add remaining coconut flour to achieve a thick batter. It’s better to add flour in small amounts until you find the correct texture than to compensate by adding more liquids and fats.
The batter for this loaf will be soft and fluffy in texture.
Remove ½ cup of batter from the bowl and mix in with the honey and cinnamon mixture. Set aside.
To the remaining batter, add baking soda and mix quickly and completely.
Add apple cider vinegar and mix together quickly.
Place one cup of batter into the loaf pan and spread out evenly using a spoon or spatula spreader. Spoon half of the cinnamon/honey mixture over the batter.
Pour the remaining batter over the top of the cinnamon mixture and spread evenly to the sides. Pour the remainder of the cinnamon mixture on top and swirl with a knife.
Place immediately into a preheated oven. Bake 45 minutes. Loaf will look nicely brown on top, firm on the sides but may be still slightly squishy at the center. If so, lightly cover with a tent of aluminum foil and bake 10 more minutes.
At this point if the top still feels slightly squishy, turn off the oven and leave the loaf for 5 or 10 more minutes. This will usually allow the loaf to finish baking fully.
Notes
*The loaf pan I used was metal and measured 8.5″ x 4.5″ x 2.5.
GAPS DIET JOURNEY is a participant in the Amazon Services LLC Associates Program, an affiliate advertising program designed to provide a means for sites to earn advertising fees by advertising and linking to AMAZON.COM. GAPS DIET JOURNEY is an affiliate for several companies and may be compensated through advertising and marketing channels. Therefore, this post may contain affiliate links.