GAPS Diet Journey Logo

Blog

  • Grain Free Corn Free Tamales

    Grain Free Corn Free Tamales

    Tamales with No Corn

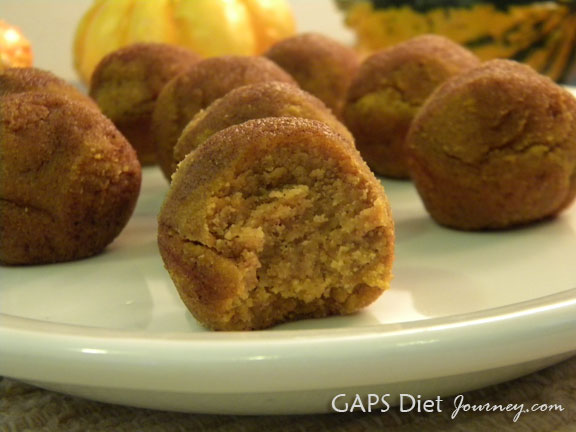
    Tamales are a process and these are definitely worth the time and effort! These are delicious, and very much like the REAL THING. They are so good that I ate 8 of the 15 we made yesterday, all by myself. I say these are a winner!

    Matthew asks for “Mollies”

    My son Matthew asked for “mollies” a few nights ago. My husband and I, as happens on occasion, were stumped. Matthew drew pictures and pantomimed. Finally after about fifteen minutes, my husband got it. Tamales! I have been missing tamales, living in Arizona, especially at this time of year. Our Hispanic community is making and selling tamales everywhere. Even at work for our potluck someone brought homemade tamales, which of course I was not able to eat since they contain corn.

    I’d thought about trying to make tamales using coconut flour [affiliate link] or almond flour [affiliate link], but that’s as far as I got.  When Matthew asked, I decided to start looking.

    Making tamales was going to be a bit of a challenge, in that while I have eaten many tamales in my 49 years, I have not actually made them. It helps tremendously when you know what texture you are after.

    However, I am lucky that my husband and our younger son have made traditional, authentic Mexican tamales many times in the past few years. I’ve watched them but haven’t actually participated in the process. Thankfully my husband was home to observe as I put the dough together.

    Coconut Flour Didn’t Work

    Last weekend I tried a recipe using coconut flour; but it did not work out. The coconut flour was just too, too sweet tasting and the tamales were moist but somehow sucked every bit of moisture out of my mouth and then clumped in my throat, you know how coconut flour can do that sometimes?

    Would Almond Flour Be the Ticket?

    So next on the list… almond flour. I did a search on the Internet and found this recipe: Tamales. Yes, Tamales. from Not Just Broccoli  but it calls for oat flour… which is not GAPS legal. The flax seed is GAPS legal, although it is considered an advanced food. Dr. Natasha says this on her FAQ page about flax seed:

    Flax and chia seeds and oils are allowed on the Full GAPS diet. As a whole seed they are very fibrous and should not be consumed until diarrhoea has cleared completely.

    All right, this is where things get complicated because making tamales isn’t something you do all at once. First you need some good meat to put inside the masa and second you need chili sauce.

    The Meat

    3 or more pounds of Pork butt roast or chuck roast

    Toss the meat into your crock pot and cook on low for 10 hours, or until you can easily shred the meat using a fork. Once you have the meat shredded, mix in red chili sauce to moisten it.

    The Red Chili Sauce

    For the sauce, I have to send you to a different recipe. This is the one I used: Red Chili Sauce To Be Used with Traditional Tamales

    However, I omitted the flour since we are gluten-free. Here are the other changes I made to the recipe:

    1. I didn’t roast the dried chiles in the oven (I didn’t notice that step)
    2. I soaked the dried chiles in 3 cups of pork broth which I took from the meat in the crock pot and blended the chiles in the pork broth which they soaked in to soften

    I am really not sure what happened but my sauce ended up thick like paste. Which was okay with me, I just put in more broth to water it down.

    Now for the masa part of these tamales. My husband recited the recipe that he and our son used when using regular corn masa, and between his and the recipe mentioned earlier (Tamales. Yes, Tamales. from Not Just Broccoli) I came up with my own, and wow was I lucky to hit it on the first try! Sometimes that just happens! I did make a second batch today to retest and make sure I had the ingredients correct.

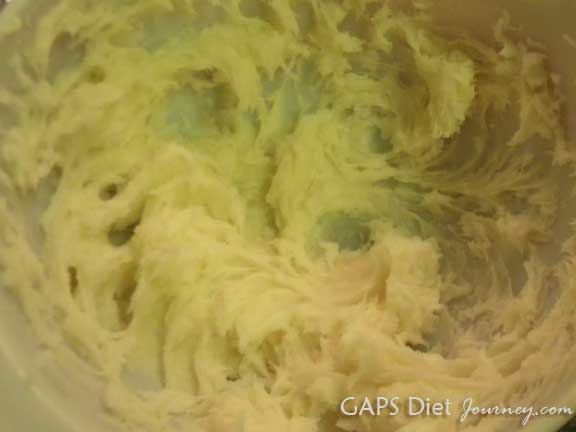
    Almond Flour Flax Meal Masa

    • 2-1/2 cups blanched almond flour
    • 1/2 cup flax seed, freshly ground into powder (I use this brand: Go Raw’s Organic Sprouted Flax Seeds)
    • 8 ounces lard
    • 1/2 cup broth, red chili sauce or water
    • 1 teaspoon salt

    The masa is very easy to put together. Just place all ingredients into a big bowl and mix until thoroughly blended. I videotaped the process and you can see that here:

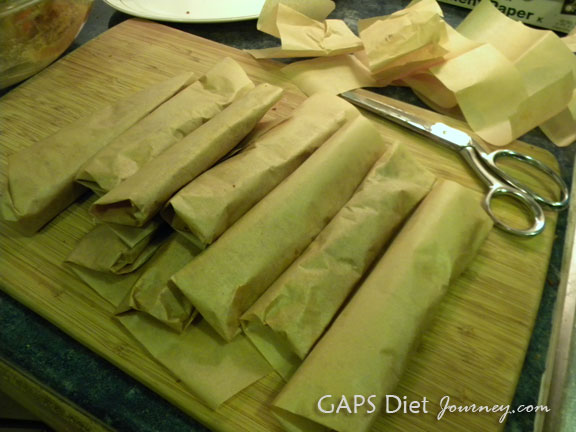
    Yesterday my husband helped me put together the first batch of tamales and we made 15 tamales using the masa mixture. I think that is because my husband made some fatter tamales, whereas my second batch today I made all slender tamales.

    Since I opened my big mouth on Facebook and shared the recipe, I wanted to hurry and get the recipe up, but I only had 10 ounces of meat left. So I was only able to make 10 tamales with this batch. I have quite a bit of masa left over, at least enough to make two dozen more tamales.

    So I am going to go out on a limb and say the masa for this recipe will make 36 small tamales. You will need about one ounce of meat for each tamale, plus 1 black or green olive to stuff in the middle. Please do not go “authentic” and use green olives that are not pitted unless you warn anyone eating your tamales that they have basically a rock inside. 😉

    Okay, now for the assembling process. I have a video, and I have still photos. Here’s the video – I assemble four or five tamales so you can see the process a few times.

    I love my Spatula Spreader, it’s this one here:

    Okay, get yourself a couple of tablespoons of masa on your spatula spreader or spoon or whatever you are using.

    Grain Free Corn Free Tamales

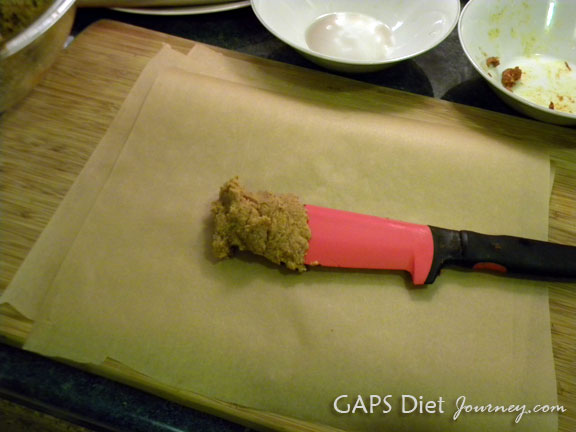
    Spread onto the parchment paper. I used Unbleached Parchment Paper.

    Grain Free Corn Free Tamales

    Spread it out until it is about as thick as two quarters (so says my hubby). This is roughly about 6″ x 5″.

    Grain Free Corn Free Tamales

    Line up some tamale meat in the center of the masa, and tuck in one black olive.

    Grain Free Corn Free Tamales

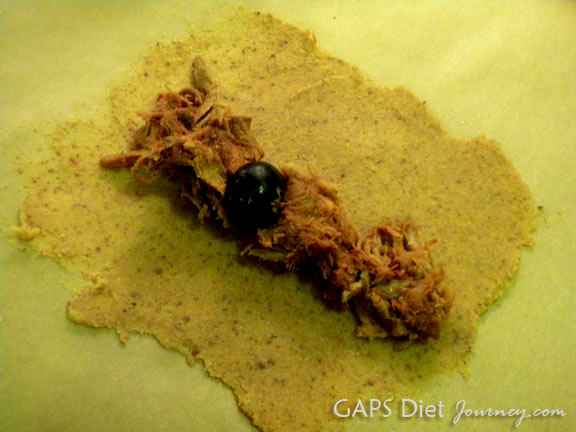
    Fold over until the two ends match up against each other.

    Grain Free Corn Free Tamales

    Grain Free Corn Free Tamales

    Using your thumbnail or fingers, squish the thin layer of masa toward the tamale. Squish the parchment paper at both ends so that the masa meets.

    Grain Free Corn Free Tamales

    Fold the parchment paper over, then fold up at the bottom. Leave the top unfolded.

    Grain Free Corn Free Tamales

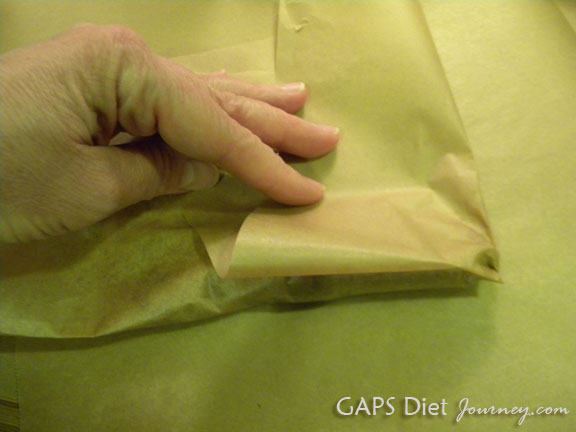
    Trim the top edge of the parchment paper.

    Grain Free Corn Free Tamales

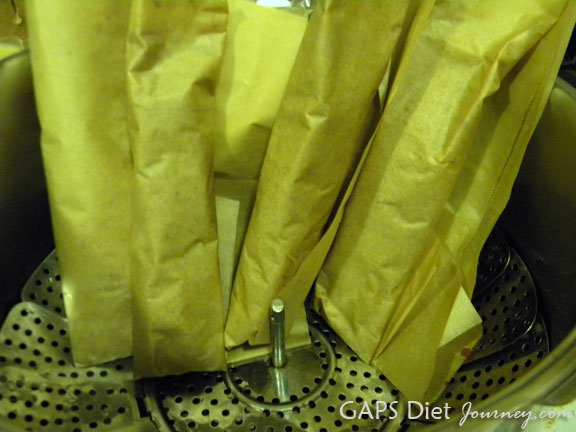
    Using a colander and steamer, stand the tamales up well above the water. To help these stay upright I crumpled a piece of aluminum foil and tucked it behind the tamales.

    Grain Free Corn Free Tamales

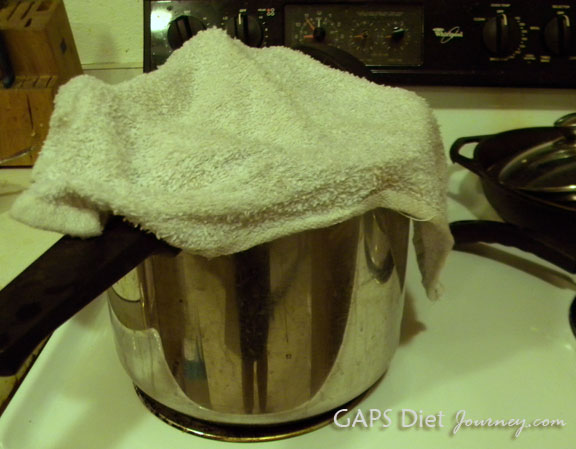
    Cover with a damp towel and allow to steam for about one hour.

    Grain Free Corn Free Tamales

    When one hour is up, remove one tamale and let it sit on the counter for a few minute to cool and firm up. Unwrap after a few minutes and make sure the masa is set up. If it is firm to the touch, then you are probably good to go! Turn the heat off and remove those babies from the pot.

    Please let me know if you get a chance to try these, I would love to know how they turn out for you!

    This recipe shared at Fat Tuesday.

    In case you are interested, the coconut flour tamale recipe can be found here: Play Hard, Eat Good: Cold Coconut Chicken Tamales

    GAPS DIET JOURNEY is a participant in the Amazon Services LLC Associates Program, an affiliate advertising program designed to provide a means for sites to earn advertising fees by advertising and linking to AMAZON.COM. GAPS DIET JOURNEY is an affiliate for several companies and may be compensated through advertising and marketing channels. Therefore, this post may contain affiliate links.

  • Top 12 Posts in 2012

    Top 12 Posts in 2012

    Top 12 Posts in 2012

    I’ll let the pictures do the talking… please have a safe evening and I wish you optimum health in 2013! Hugs, Starlene

    12. Bacon Muffins

    Bacon Muffins

    11. Chocolate Medallion Cookies

    Chocolate Medallions with Butter Cream Frosting

    10. Chocolate Coconut Fudge Bites

    Chocolate Coconut Fudge Bites

    9. Squash Pancakes

    Squash and Peanut Butter Pancakes

    8. Cherry Cheesecake Ice Cream Dairy Free

    Cherry Cheesecake Ice Cream

    7. Strawberry Shortcake Medallion Cookies

    Strawberry Shortcake Medallion Coconut Cookies

    6. Zucchini Bread

    Zucchini Bread

    5. Pretzels Gluten and Grain Free

    Gluten Free and Grain Free Pretzels

    4. Pumpkin Bread

    Pumpkin Bread Gluten/Grain/Dairy/Sugar-Free

    3. Coconut Milk Pumpkin Pie Custard

    Coconut Milk Honey Pumpkin Custard

    2. Cauliflower Pizza Crust Dairy-Free

    Awesome pizza!

    1. Pumpkin Poppers

    Pumpkin Poppers with Cinnamon Topping

    GAPS DIET JOURNEY is a participant in the Amazon Services LLC Associates Program, an affiliate advertising program designed to provide a means for sites to earn advertising fees by advertising and linking to AMAZON.COM. GAPS DIET JOURNEY is an affiliate for several companies and may be compensated through advertising and marketing channels. Therefore, this post may contain affiliate links.

  • White Chocolate Peppermint Truffles

    White Chocolate Peppermint Truffles

    White Chocolate Peppermint Truffles

    These truffles are rich and tasty, with a smooth texture and minty flavor. They are also low in oxalates. My original goal in creating this treat was to create a white chocolate version of my Chocolate Coconut Fudge Bites. Then I wondered if I could make them low oxalate as well. My curiosity was piqued recently when I read a blog post at Roo’s Clues which talked about how oxalates “…injure and kill the mitochondria” and it made me wonder if I should look more closely at avoiding oxalates. My friend Patty from Loving Our Guts has written a very informative post called What Are Oxalates? [Courtesy of Internet Archive] which will explain more in case you are also interested.

    Since my friend Patty is practically an expert on oxalates, I asked her about twenty questions on Facebook one night to see if I could figure out how to make this recipe low oxalate. With her help, I was successful. Not only are these truffles low oxalate (Patty says they contain just over 1 mg oxalates per truffle) but they are minty and rich tasting.

    Patty also introduced me to Be Young essential oils, as this is another way she has found to keep the oxalates low in the diet. I recently ordered Peppermint and Spearmint. This recipe includes four drops of the Peppermint oil and Patty says, “If you purchase them [essential oils] from a pure source like Be Young nearly all of them can be ingested and used topically. Some care should be used by pregnant women and on young children with some of the oils. Peppermint is one that can raise the blood pressure and cause contractions in pregnant women so a trial with just sniffing it is advised for pregnant women and those with high blood pressure and if it is too strong spearmint can be used in its place.

    And now for the recipe!

    White Chocolate Peppermint Truffles

    • 1/2 cup coconut cream [affiliate link] concentrate (aka coconut butter)
    • 1/4 cup cocoa butter
    • 1/2 cup sunflower seeds
    • 1-1/2 cups shredded coconut + 1/4 cup for decoration
    • 1 T. coconut flour [affiliate link]
    • 1 t. vanilla [affiliate link]
    • 1 pinch sea salt [affiliate link]
    • 3 T. honey [affiliate link]
    • 4 drops Be Young Peppermint Essential Oil
    • 2 teaspoons water
    1. Warm coconut cream concentrate until it is the consistency of smooth peanut butter [affiliate link].
    2. Melt cocoa butter.
    3. Add coconut cream concentrate and cocoa butter to your food processor.
    4. Add sunflower seeds, shredded coconut, coconut flour, vanilla, salt, honey and 4 drops of peppermint oil. Be very careful that you only get four drops. I found it was best to drop the oil onto a spoon first so that I could be sure to count the drops. They dripped out of my bottle very fast.
    5. Blend until smooth. While the processor is blending, add the two teaspoons of water. This should cause the mixture to slightly ball up as it blends around.
    6. Using a teaspoon measurement, scoop 2 even teaspoons for each truffle. Mash together and roll between your hands to form a round ball. If you roll them too roughly they will fall apart so it’s best to mash them into shape firmly initially, and then gently roll into a ball. Yields 32 truffles.
    7. Roll in the remaining 1/4 cup of shredded coconut to decorate.

    Alternately you may press evenly into an 8? x 8? square pan, lined with parchment paper. Sprinkle shredded coconut on top to decorate. Place in freezer for 15 minutes to harden. Cut into small squares. These are less time consuming and they taste just as delicious!

    By the way, the squares are awesome straight from the freezer!  At the time of writing the post I had only frozen the balls and they were hard to bite into. The squares are hard but since they are thin they quickly warm in your mouth and are easy to chew. You get a burst of sweet mint with each bite. 🙂

    White Chocolate Peppermint Truffles
    Author: 
     
    Ingredients
    • ½ cup coconut cream concentrate (aka coconut butter)
    • ¼ cup cocoa butter
    • ½ cup sunflower seeds
    • 1-1/2 cups shredded coconut + ¼ cup for decoration
    • 1 T. coconut flour
    • 1 t. vanilla
    • 1 pinch sea salt
    • 3 T. honey
    • 4 drops Be Young Peppermint Essential Oil
    • 2 teaspoons water
    Instructions
    1. Warm coconut cream concentrate until it is the consistency of smooth peanut butter.
    2. Melt cocoa butter.
    3. Add coconut cream concentrate and cocoa butter to your food processor.
    4. Add sunflower seeds, shredded coconut, coconut flour, vanilla, salt, honey and 4 drops of peppermint oil. Be very careful that you only get four drops. I found it was best to drop the oil onto a spoon first so that I could be sure to count the drops. They dripped out of my bottle very fast.
    5. Blend until smooth. While the processor is blending, add the two teaspoons of water. This should cause the mixture to slightly ball up as it blends around.
    6. Using a teaspoon measurement, scoop 2 even teaspoons for each truffle. Mash together and roll between your hands to form a round ball. If you roll them too roughly they will fall apart so it’s best to mash them into shape firmly initially, and then gently roll into a ball. Yields 32 truffles.
    7. Roll in the remaining ¼ cup of shredded coconut to decorate.
    8. Alternately you may press evenly into an 8? x 8? square pan, lined with parchment paper. Sprinkle shredded coconut on top to decorate. Place in freezer for 15 minutes to harden. Cut into small squares. These are less time consuming and they taste just as delicious!


    GAPS DIET JOURNEY is a participant in the Amazon Services LLC Associates Program, an affiliate advertising program designed to provide a means for sites to earn advertising fees by advertising and linking to AMAZON.COM. GAPS DIET JOURNEY is an affiliate for several companies and may be compensated through advertising and marketing channels. Therefore, this post may contain affiliate links.

  • Merry Christmas!

    Merry Christmas!

    Snowman Greeting

    I came across this image I created in 1998! An animated image I drew using Paint, remember that program?

    If you celebrate, or not, I hope you have a relaxing and joyous day today!

    GAPS DIET JOURNEY is a participant in the Amazon Services LLC Associates Program, an affiliate advertising program designed to provide a means for sites to earn advertising fees by advertising and linking to AMAZON.COM. GAPS DIET JOURNEY is an affiliate for several companies and may be compensated through advertising and marketing channels. Therefore, this post may contain affiliate links.

  • Cranberry Pineapple Sauce with Walnuts

    Cranberry Pineapple Sauce

    I just made a double batch of this cranberry sauce. In my whole life I would say I haven’t eaten more than a quart of cranberry sauce, and I’ve been alive and eating for a long time. 😉   I haven’t been too big a fan of cranberry sauce, but I did always have the obligatory spoonful or two when served at holiday meals. Until this year… my son told me he was going to try making cranberry sauce with pineapple instead of orange, and it just sounded good so I thought I would do the same. My recipe is adapted from this one: Delicious Cranberry Pineapple Sauce.

    This recipe makes 5 cups.

    I was hesitant to make a full batch because the original recipe says it makes approximately 6 cups and I was concerned that we would not be able to eat this much cranberry sauce in a lifetime. 😉  Well, as it turns out, my husband loved it so much he was eating it by the heaping tablespoonful at Thanksgiving and I had several teaspoons myself. I took some to work to share with my boss and she loved it so much that I ended up making a batch just for her at our Christmas staff party at work. Everyone had to try some so she ended up with just a small amount to take home. That is why I just made a double batch today. One batch for us, for Christmas Day, and one batch for my boss and her husband. There is a printable recipe below.

    UPDATE: November 18, 2013  I made this recipe over the weekend and used pineapple that was not very sweet. It had a HUGE impact on the way this recipe turned out. I have had to add a significant amount of honey [affiliate link] and it still does not taste right. My advice is to make sure your pineapple is sweet, otherwise you’ll need to add more sweetener.

    Cranberry Pineapple Sauce with Walnuts

    • 24 ounces fresh cranberries
    • 1 pineapple
    • 1/2 cup honey
    • 1-1/4 cup walnuts [affiliate link]
    • 1 tablespoon fresh lime juice
    • 1/4 teaspoon ground cloves [affiliate link]

    Trim the rind from the pineapple. Cut into slices and cut into pieces, removing the core.

    Place the pineapple pieces into a large bowl and using a potato masher, crush the pieces to remove the juice.

    Place crushed pineapple into a sieve and strain out the juice. Measure the juice and add water so that you have two cups total.

    Rinse the cranberries with cool water, picking out any that are super mushy.

    Place the cranberries into a pan with the juice, water and honey.

    Stir over medium heat and bring mixture to a boil. Continue to boil until most of the berries have popped and the mixture has thickened, about 15 minutes.

    Remove from heat. Add the crushed pineapple, walnuts, lime juice and ground cloves. Stir and allow to cool to room temperature.

    Refrigerate for 24 hours before serving.


    Cranberry Pineapple Sauce with Walnuts
    Author: 
    Recipe type: Condiment
    Prep time: 
    Cook time: 
    Total time: 
    Serves: 5 cups
     
    Ingredients
    • 24 ounces fresh cranberries
    • 1 pineapple
    • ½ cup honey
    • 1-1/4 cup walnuts
    • 1 tablespoon fresh lime juice
    • ¼ teaspoon ground cloves
    Instructions
    1. Trim the rind from the pineapple. Cut into slices and cut into pieces, removing the core.
    2. Place the pineapple pieces into a large bowl and using a potato masher, crush the pieces to remove the juice.
    3. Place crushed pineapple into a sieve and strain out the juice. Measure the juice and add water so that you have two cups total.
    4. Rinse the cranberries with cool water, picking out any that are super mushy.
    5. Place the cranberries into a pan with the juice, water and honey.
    6. Stir over medium heat and bring mixture to a boil. Continue to boil until most of the berries have popped and the mixture has thickened, about 15 minutes.
    7. Remove from heat. Add the crushed pineapple, walnuts, lime juice and ground cloves. Stir and allow to cool to room temperature.
    8. Refrigerate for 24 hours before serving.

     
    GAPS DIET JOURNEY is a participant in the Amazon Services LLC Associates Program, an affiliate advertising program designed to provide a means for sites to earn advertising fees by advertising and linking to AMAZON.COM. GAPS DIET JOURNEY is an affiliate for several companies and may be compensated through advertising and marketing channels. Therefore, this post may contain affiliate links.

  • Cookie Cutter Cookies (Grain-Free Egg-Free Dairy-Free & GAPS legal)

    Cookie Cutter Cookies (Grain-Free Egg-Free Dairy-Free & GAPS legal)

    Grain-free Snowman Cookies

    I have two variations of this recipe. I’m sharing the egg-free version here at the blog and the version which contains one egg is featured today in a guest post at my friend Jessica’s blog, Delicious Obsessions.

    One of my favorite memories as a child was making cookie cutter cookies at Christmas. This was a tradition which I shared with my children as well. But since I’m doing GAPS, those old favorite recipes are not acceptable, and since my children are grown I hadn’t thought too much about it. Around Thanksgiving I saw Jill from Real Food Forager’s Grain Free Holiday Roll Out Cookies and I decided to give them a try. Jill asked for comments on decorating the cookies to make them SCD and GAPS legal, and that started me thinking.

    Every year at my job I set up my collection of snow people and one of my coworkers asked if I would consider making some kind of Christmas cookies to share… it occurred to me that it would be really cool to make some snow people cookies. I decided I would make vegetable leather from beets and carrots to decorate! I wasn’t sure if it would work out, but I figured it couldn’t be much different than making fruit leather.

    Although butter and ghee are legal on GAPS, I know there are a lot of people who don’t tolerate even butter and ghee, so I thought I would try making these cookies with coconut oil [affiliate link]. The other adaptations from Real Food Forager’s recipe is that I omitted the baking soda [affiliate link], exchanged orange zest for lemon, added cloves [affiliate link] and exchanged the egg for flax “egg” substitute.

    Now without further ado, here is the recipe! You can find a printable version of the recipe below.

    Grain-Free Cookie Cutter Cookies

    Grind sprouted flax seeds until turned into flour. I used my Magic Bullet with the low blade. Place ground flax seeds in a small bowl. Add water one tablespoon at a time and mix thoroughly. Place in the refrigerator for 15 minutes to allow flax “egg” to set up.

    Place 1/2 cup solid coconut oil in a bowl. Add 1/4 cup honey [affiliate link].

    Grain-Free Cookie Dough

    Beat with mixer until whipped.

    Grain-Free Cookie Dough

    Add orange zest, cloves and vanilla. Add the flax “egg” and mix together.

    Grain-Free Cookie Dough

    Measure 1/2 cup of coconut flour [affiliate link], firmly packed. I use Tropical Traditions and keep it in the freezer so it is still kind of moist and clumps together. Use the back of a knife to cut across the measuring cup to be sure you get an even measurement.

    Reserve two tablespoons.

    Sift the coconut flour to remove any small clumps. Mix the coconut flour into the bowl and mix thoroughly with a hand mixer. Allow to sit five minutes. If the dough is stiff but pliable and forms into a ball of dough, don’t add any more coconut flour. Otherwise, add the rest of the coconut flour. Allow to sit for five minutes.

    Grain-Free Cookie Dough

    Form into a ball, the cookie dough’s texture should be very much like regular cookie cutter cookie dough.

    Grain-Free Cookie Dough

    Divide ball in half. Place each piece between a piece of parchment paper and flatten into a circle. Refrigerate 15 minutes (not any longer because the dough will become too stiff – if it does become too stiff to easily use a cookie cutter allow to sit at room temperature for a few minutes).

    Remove from refrigerator, roll the dough slightly thinner with parchment paper in place.

    Apply “clothing” before baking if you are making snow people. 🙂 You can make your own, or use store bought fruit or vegetable leather. See below for more information on making the beet and carrot leather.

    Bake at 350°F for 7 minutes.

    Yields 10 snow people.

    Beet and Carrot Leather Instructions

    When I made the beet and carrot leather I totally winged it. A few days later my husband found my Mary Bell’s Complete Dehydrator Cookbook and I was able to do some research. I will tell you what I did, and what I would change in making the beet and carrot leather again.

    Steam two medium beets, chopped and 5 peeled carrots, until fork tender. It takes 25 minutes for the carrots, and an additional 15-25 minutes for the beets.

    Add water by the tablespoon to the beets and puree them into an applesauce-like puree. Add 1-2 tablespoons of honey to the beets. Sweeten to taste, bear in mind as the leather dries it will taste sweeter.

    Do the same with the carrots. After reading my dehydrator book I discovered that vegetables do not have much pectin – apples are high in pectin. According to Mary Bell, “A sufficient amount of pectin in applesauce is the reason the leather peels off the leather sheet in one piece.” With that bit of information, I would add one cooked apple to eat vegetable puree. (I would just steam two apples and add one apple to the beets and one apple to the carrots, you will probably be able to get by with adding less honey since the apple will add sweetness).

    Spread your vegetable puree onto greased fruit leather sheets. I use this dehydrator Nesco American Harvest FD-61 Food Dehydrator with these Nesco LSS-2-6 Fruit Roll Sheets (Set of 2).

    Mary Bell says “Drying time depends upon several factors: the make of dehydrator, the thickness of puree on the leather sheets, the sugar content of the puree, and so on.”

    It is recommended to spread the puree 1/4″ thick but I spread mine thinner – about 1/8″ so that the resulting leather would be thinner for decorating the snow people cookies. It can take from 8-20 hours to dry the puree into leather.

    Beet and Carrot Vegetable Leather

    I neglected to grease my fruit roll sheets and they stuck pretty bad, so ended up placing them into the freezer which allowed me to bend them and remove the leather. I placed the leather on parchment paper.

    I used the snowman cookie cutter to press into the leather to indent a pattern for the hats, and then used scissors to cut them out. For the rest I just eyeballed the sizes, using scissors to cut the scarves, aprons, hat bands, flowers, etc.

    It took me 5-6 minutes to decorate each snow person so this is definitely a labor of love. 🙂

    I just laid the vegetable leather on the raw cookies, when placing the hat band on the hat I just placed my finger into a bowl of water and moistened the bottom of the hat band so it would stay in place.

    Let me know if you try making these cookies, I would love to see pictures of your decorated cookies!

    *If you order from Tropical Traditions by clicking on any of my Tropical Traditions links and are a brand new customer, you will receive this free book: Virgin Coconut Oil : How it Has Changed People’s Lives, and How it Can Change Yours, and I will receive a discount coupon for referring you. Thank you!

    This post shared at Fat Tuesday’s Christmas Edition.

    Grain-Free Egg-Free Cookie Cutter Cookies
    Author: 
    Recipe type: Cookies
    Serves: 10
     
    Cookie cutter cookies
    Ingredients
    • ½ cup coconut oil
    • ¼ cup honey
    • 1 Tablespoon sprouted flax seeds (I used Go Raw’s Organic Sprouted Flax Seeds)
    • 2 teaspoons orange zest (about 2 medium oranges)
    • ⅛ teaspoon cloves
    • 1 teaspoon vanilla
    • ½ cup coconut flour
    • Fruit or vegetable leather (for decorating, if desired)
    Instructions
    1. Grind sprouted flax seeds until it is turned into flour. I use Magic Bullet [affiliate link] with the low blade. Place ground flax seeds in a small bowl. Add water one tablespoon at a time and mix thoroughly. Place in the refrigerator for 15 minutes.
    2. Place ½ cup solid coconut oil in a bowl. Add ¼ cup honey. Beat with mixer until whipped.
    3. Add orange zest, cloves and vanilla.
    4. Add the flax “egg” and mix together.
    5. Measure ½ cup of coconut flour, firmly packed. I use Tropical Traditions and keep it in the freezer so it is still kind of moist and clumps together. Use the back of a knife to cut across the measuring cup to be sure you get an even measurement.
    6. Reserve two tablespoons of coconut flour.
    7. Sift the coconut flour to remove any small clumps. Mix the coconut flour into the bowl and mix thoroughly with a hand mixer. Allow to sit five minutes. If the dough is stiff but pliable and forms into a ball of dough, don’t add any more coconut flour. Otherwise, add the rest of the coconut flour. Allow to sit for five minutes. Form into a ball, the cookie dough’s texture should be very much like regular cookie cutter cookie dough.
    8. Divide ball in half. Place each piece between a piece of parchment paper and flatten into a circle. Refrigerate 15 minutes (not any longer because the dough will become too stiff – if it does become too stiff to easily use a cookie cutter allow to sit at room temperature for a few minutes).
    9. Remove from refrigerator, roll the dough slightly thinner with parchment paper in place.
    10. Apply “clothing” before baking if you are making snow people. 🙂 You can make your own, or use store bought fruit or vegetable leather.
    11. Bake at 350°F for 7 minutes.

    Save
    If you love recipes like this, I have two cookbooks you really need to check out ASAP! Naturally Sweetened Treats for gluten-free dessert needs and Mastering the Art of Baking With Coconut Flour.
    GAPS DIET JOURNEY is a participant in the Amazon Services LLC Associates Program, an affiliate advertising program designed to provide a means for sites to earn advertising fees by advertising and linking to AMAZON.COM. GAPS DIET JOURNEY is an affiliate for several companies and may be compensated through advertising and marketing channels. Therefore, this post may contain affiliate links.